Marketing
Turn market intelligence into outreach. Build targeted email campaigns, measure engagement in Campaign Reports, and amplify your reach by publishing content through PSN's own channels.
Note: Smart Searches in Marketing work exactly the same as in Sales — see that section for the full walkthrough. Here we focus on what's unique to Marketing.
- 1Build an audienceSelect from your saved searches the list of contacts you want to email.
- 2Create New CampaignAdd a name, subject line, and From Address.
- 3Edit message contentWrite or paste your email — use the editor button.
- 4Test Send firstSend to yourself via the Saved Campaigns row.
- 5Send & trackHit Send, then watch Campaign Reports for opens & clicks.
Where saved searches come from: the Public Bodies tab
Your Send To audiences in Campaigns are powered by saved searches you build in the main Public Bodies tab at the top of the platform — not inside Marketing itself. Once saved, they show up automatically in the Campaigns audience picker (and in Sales).
- 1Pick the sectorUse Org name and type to choose the type of organisation (e.g. Care Homes, NHS Trusts, Local Authorities).
- 2Choose the areaFilter by region, county, or local authority — e.g. Greater London.
- 3Refine by demographicsLayer on attributes like carehome capacity, school population, annual spend or number of GPs.
- 4Add postholder functionInclude specific roles (e.g. IT Director, Procurement Lead) so your email lands with the right contact.
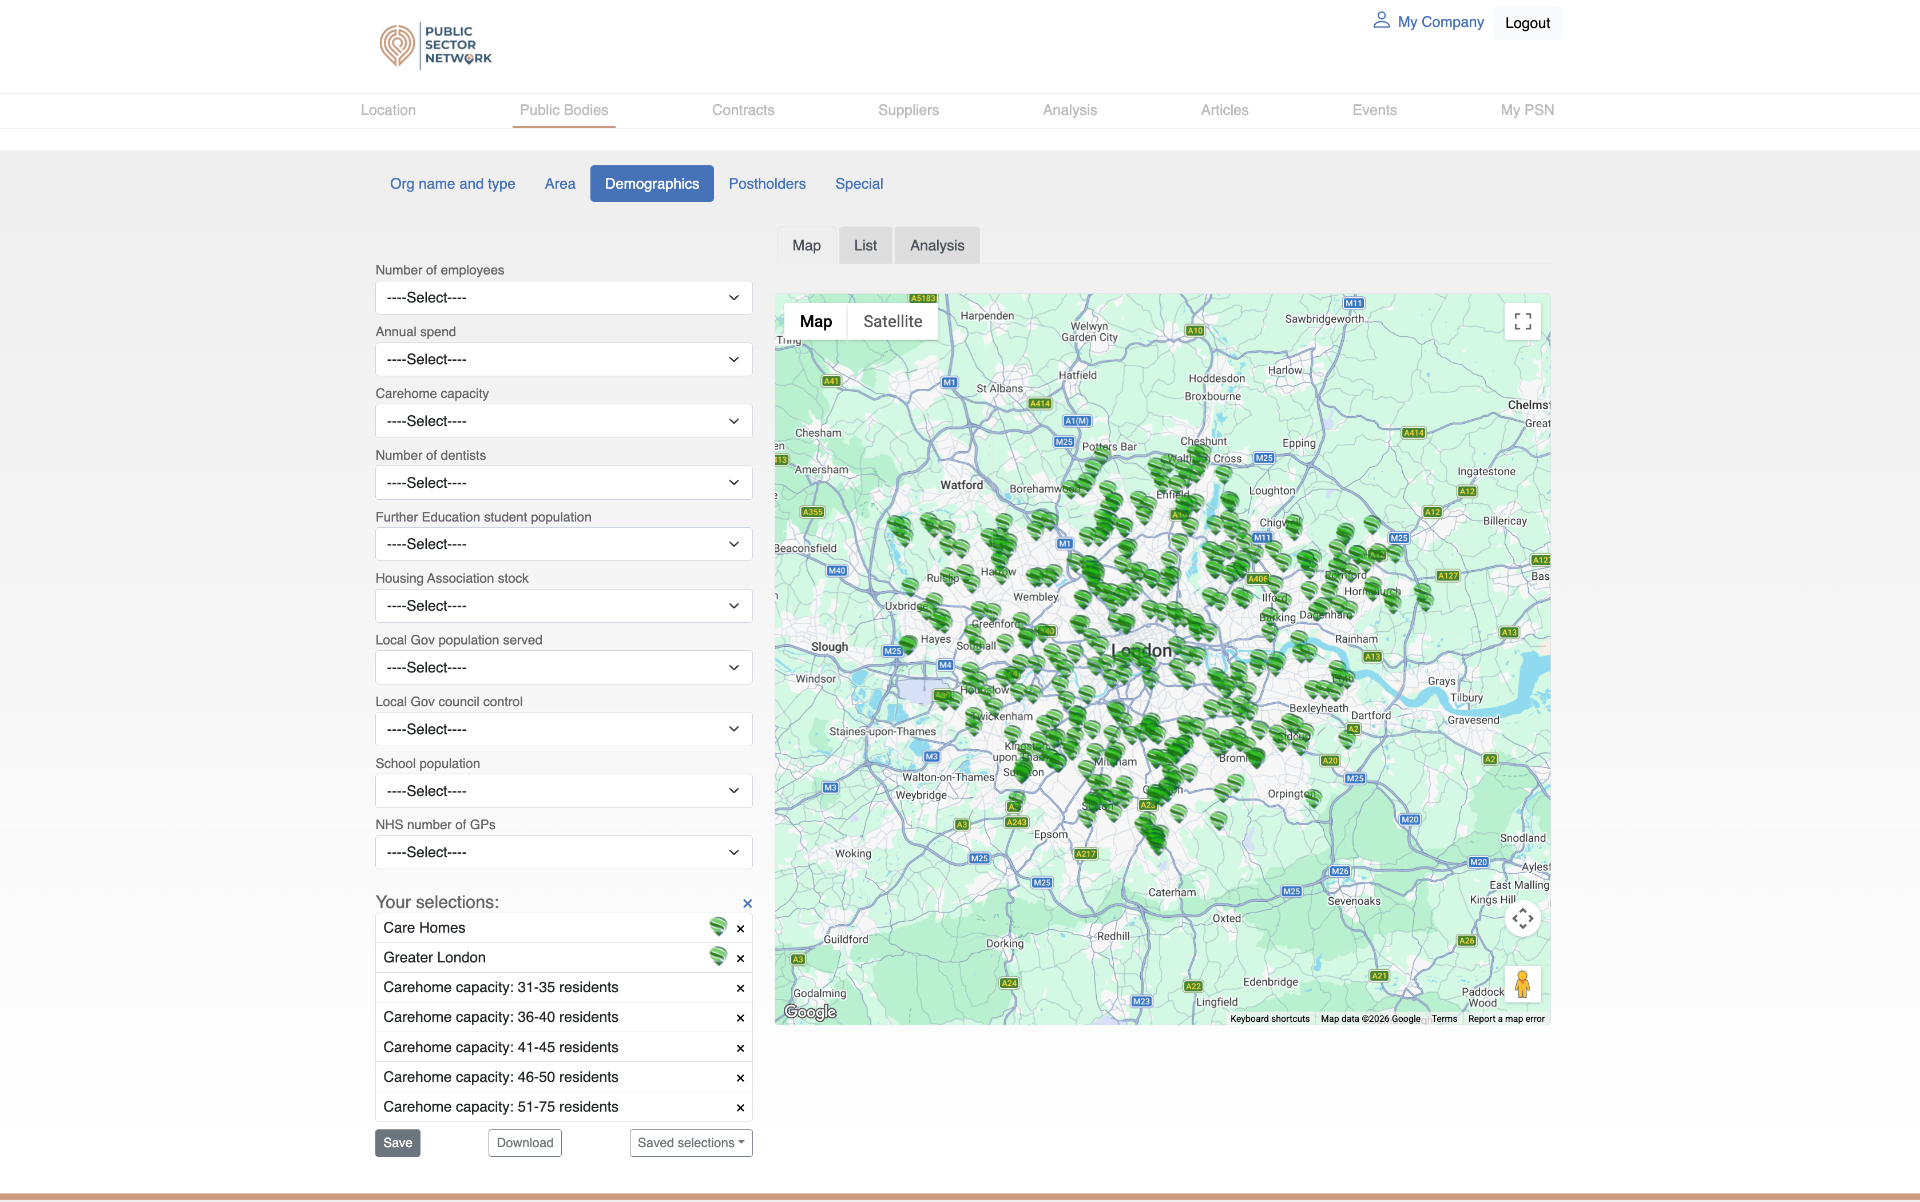
Back in Marketing, open Create New Campaign → Send To, and your newly saved search will be in the list.
Sending Setup — choose how your emails are sent
Before your first campaign, decide whether emails go out from your own company domain or from a PSN-managed domain. This is a one-time decision that affects deliverability and brand trust.
Send from your own domain
Emails come from your company address (e.g. name@yourcompany.com).
- ✓Better deliverability — less chance of spam folders
- ✓Builds trust with recipients
- ✓Keeps your brand front and centre
PSN provides a set of DNS records. Your IT team (or whoever manages your domain) adds them — this authorises PSN to send on your behalf.
- Request sender setup from your account manager
- PSN provides your DNS records
- Your IT team adds them to your domain
- PSN verifies and activates your sender address
Send via PSN (no setup)
Use a PSN-managed email domain — start sending straight away with zero technical setup.
- ✓No DNS or IT involvement
- ✓Send your first campaign today
- •Emails won't come directly from your company domain
- •Deliverability and trust may be slightly lower than using your own domain
- →Use your own domain if you want the best results and long-term performance.
- →Use PSN sending if you need to move quickly or don't have access to your domain settings.
Not sure? Your account manager can walk you through the right option and help with domain setup.
Campaigns — compose, save, send
Everything you need to launch an email campaign on one screen: credits, the composer, your saved drafts, and the report on what's already gone out.
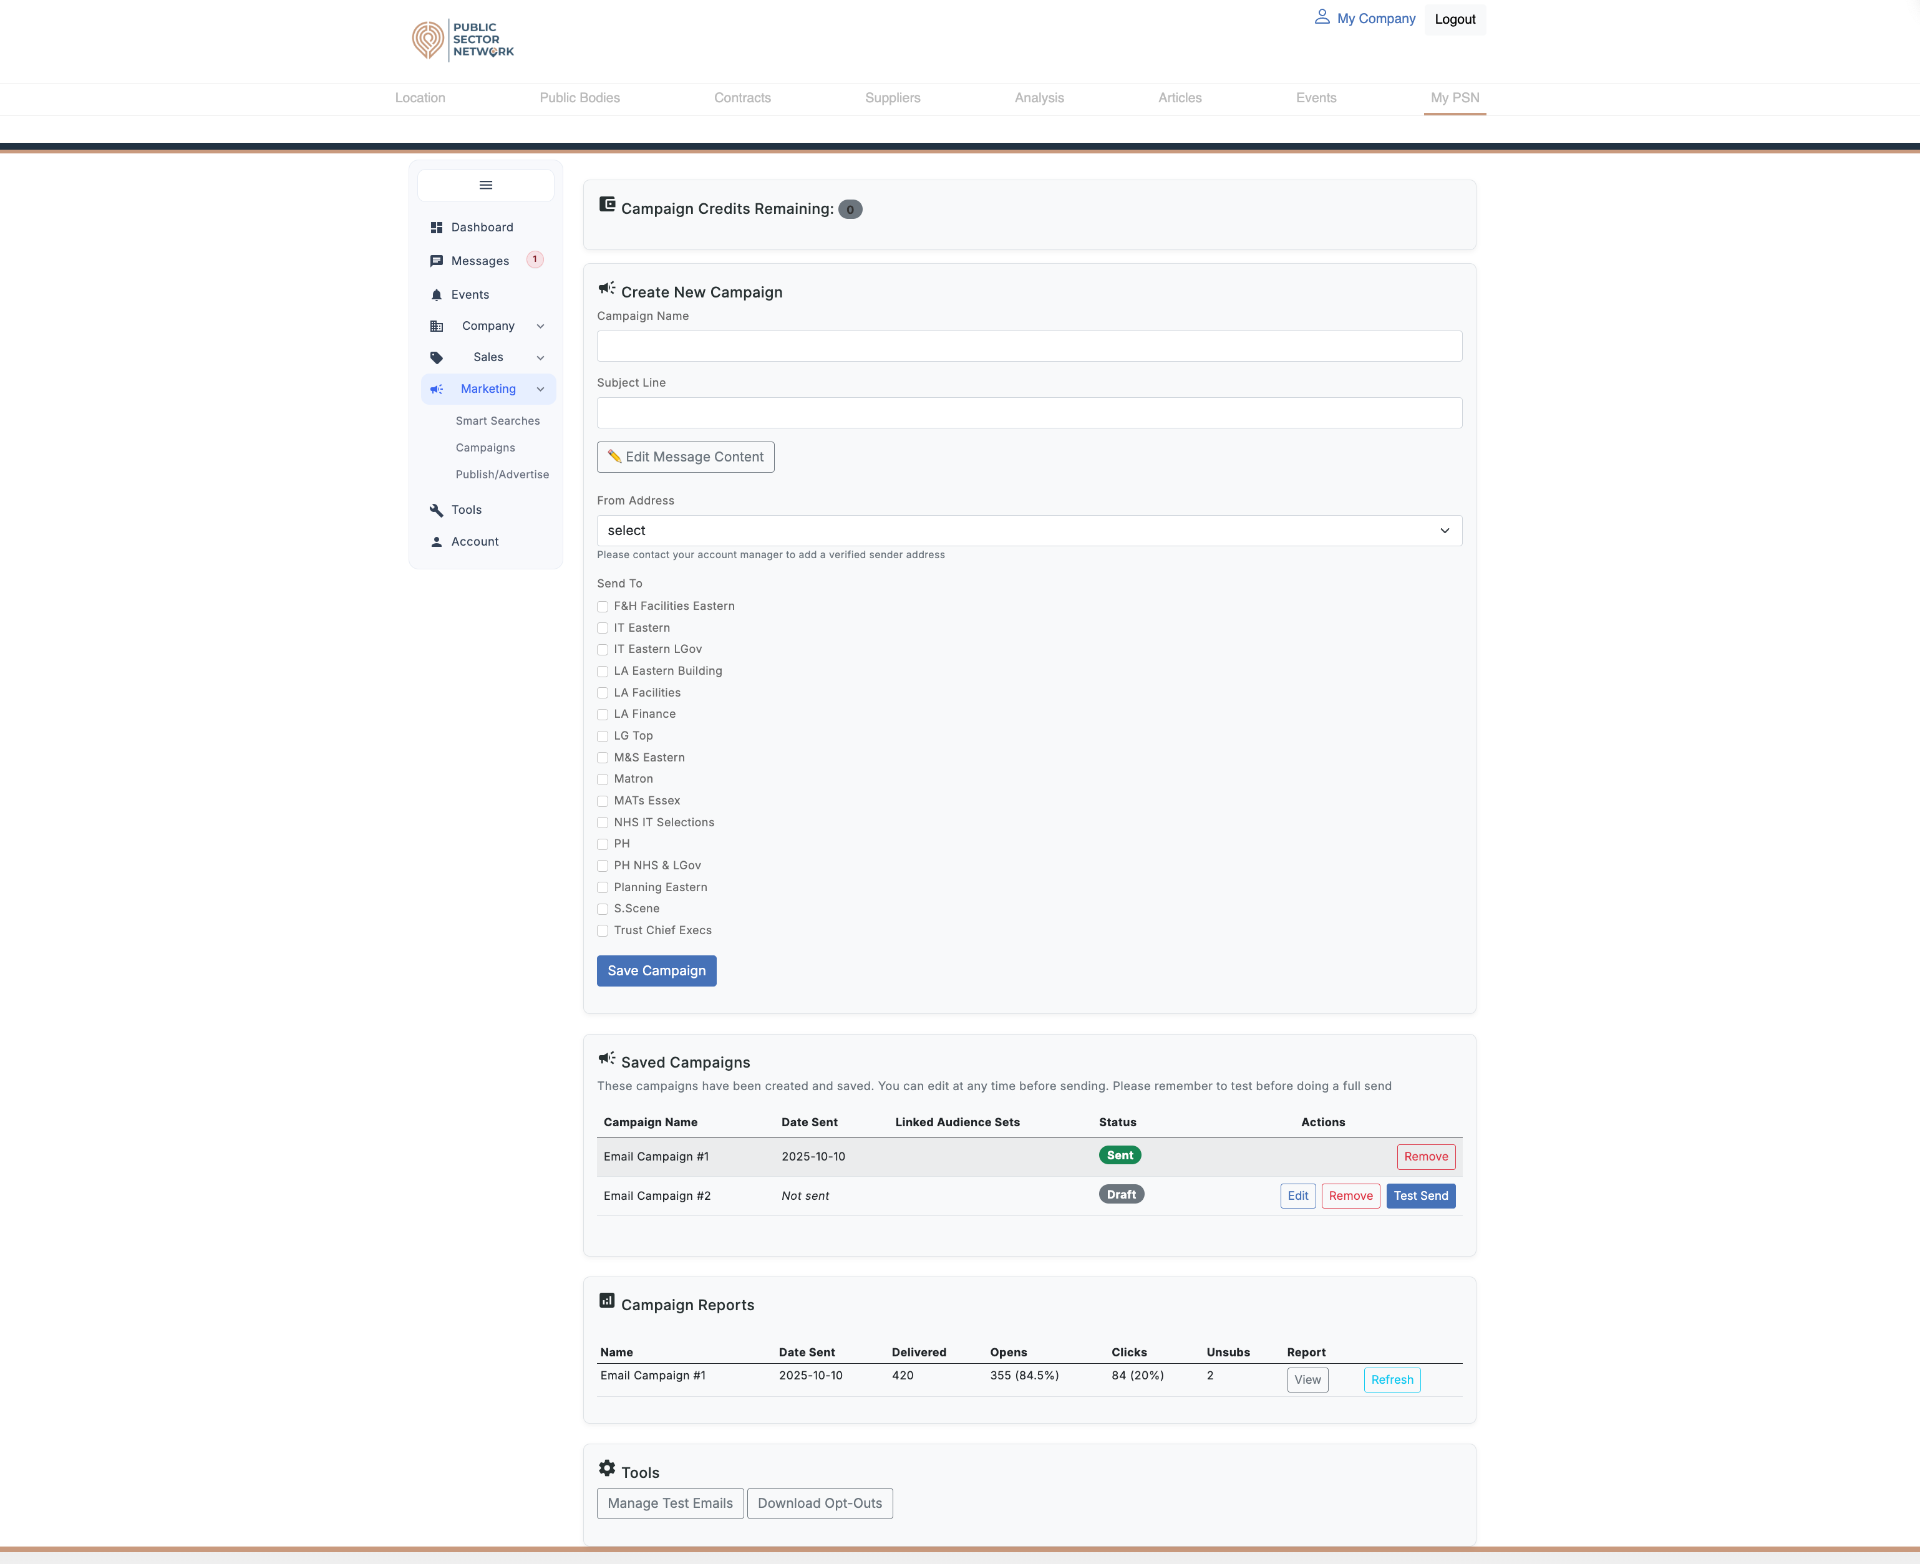 123456789
- 1Campaign Credits RemainingEach send burns one credit per recipient — check this number before scheduling a large blast.
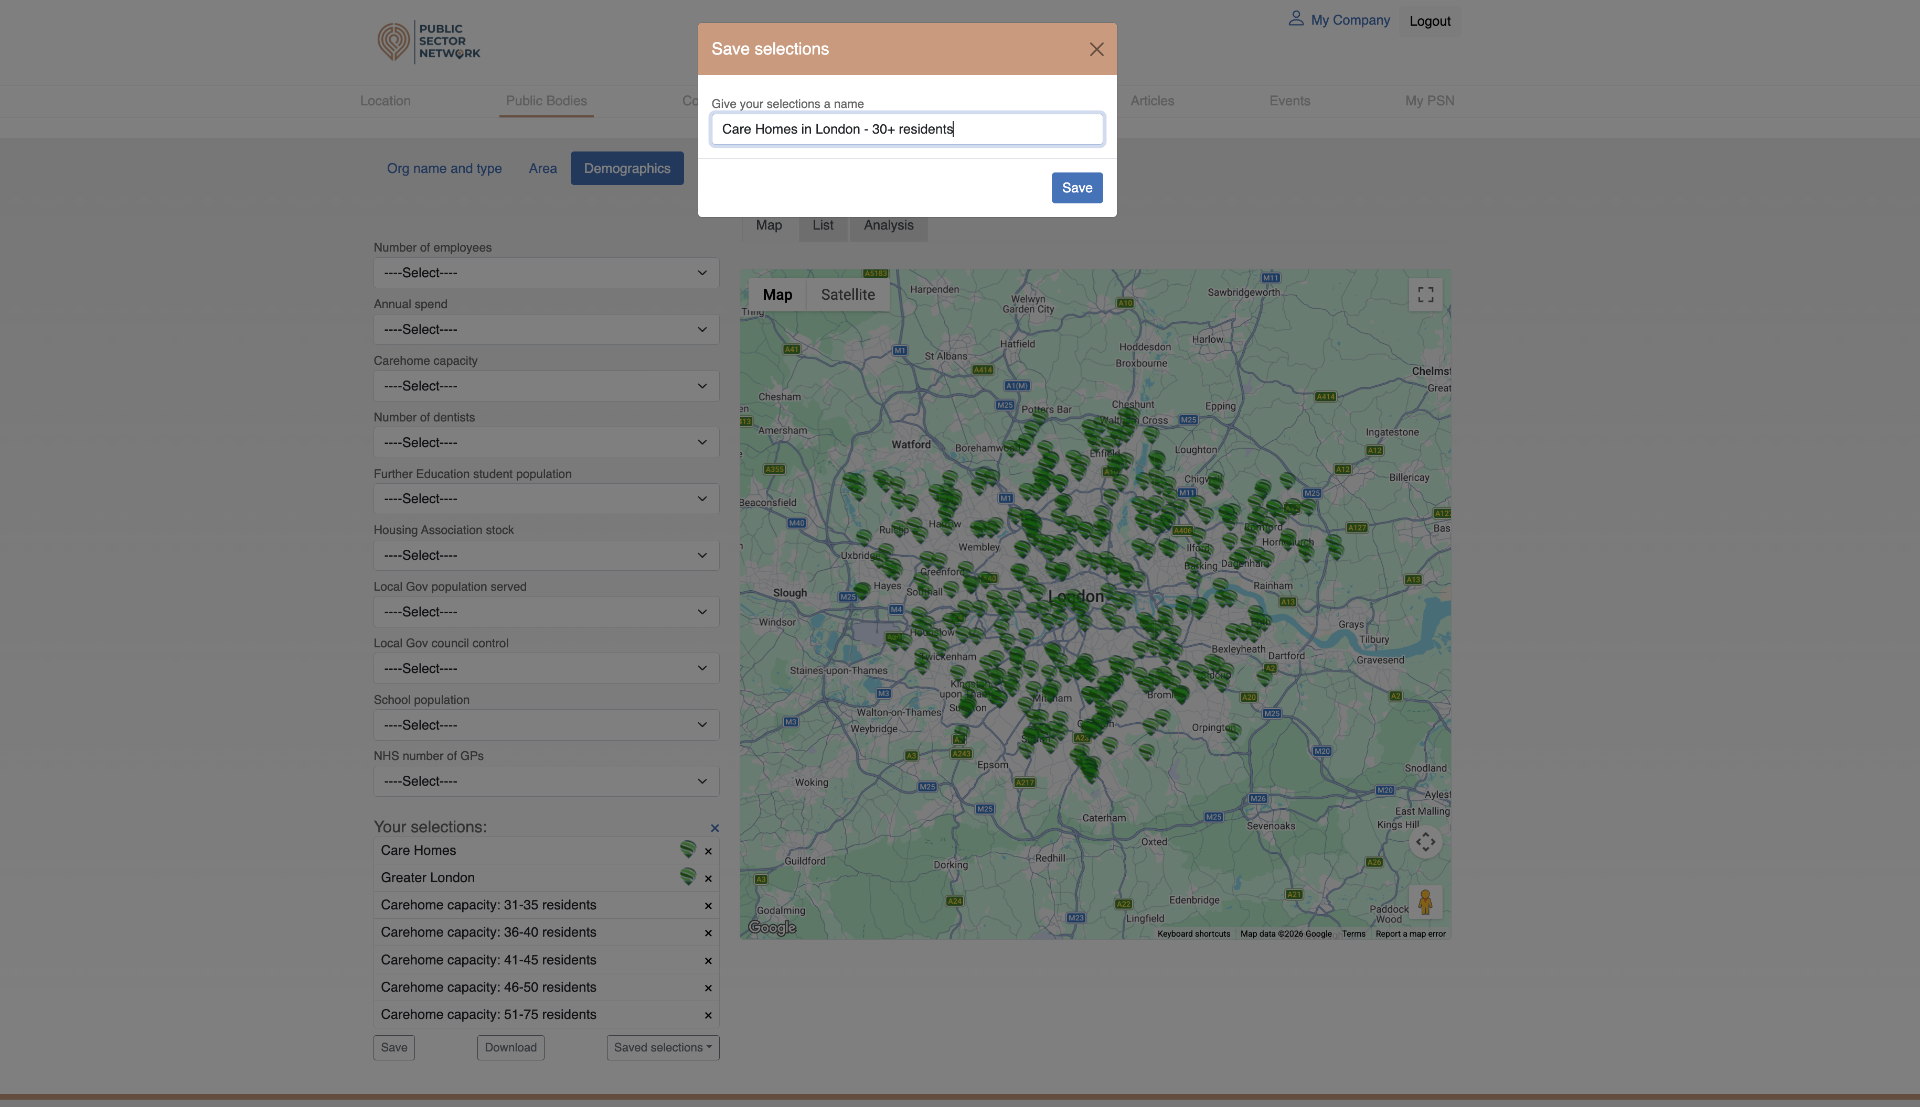
- 2Campaign NameInternal label only — not visible to recipients. Use a clear naming scheme like '2026-04 Q2 NHS IT'.
- 3Subject LineWhat recipients see in their inbox — keep it under ~60 characters and concrete.
- 4Edit Message ContentOpens the rich-text editor where you write or paste the email body and add merge fields.
- 5From AddressMust be a verified sender. If empty, contact your account manager first.
- 6Send To (audiences)Tick one or more saved Smart Search audiences. These are the same lists used in Sales.
- 7Save CampaignSaves as a draft — does NOT send. Find it in Saved Campaigns below to test or send.
- 8Saved Campaigns row actionsEdit, Remove, or Test Send each draft. 'Sent' campaigns become read-only with a green badge.
- 9Campaign ReportsAuto-populated after a send — shows Delivered, Opens, Clicks, Unsubs. Click View for the full pie chart.
When you click Edit Message Content, you can either type directly into the editor or paste in HTML you've prepared elsewhere. Use the <> (source code) button in the toolbar to paste raw HTML.
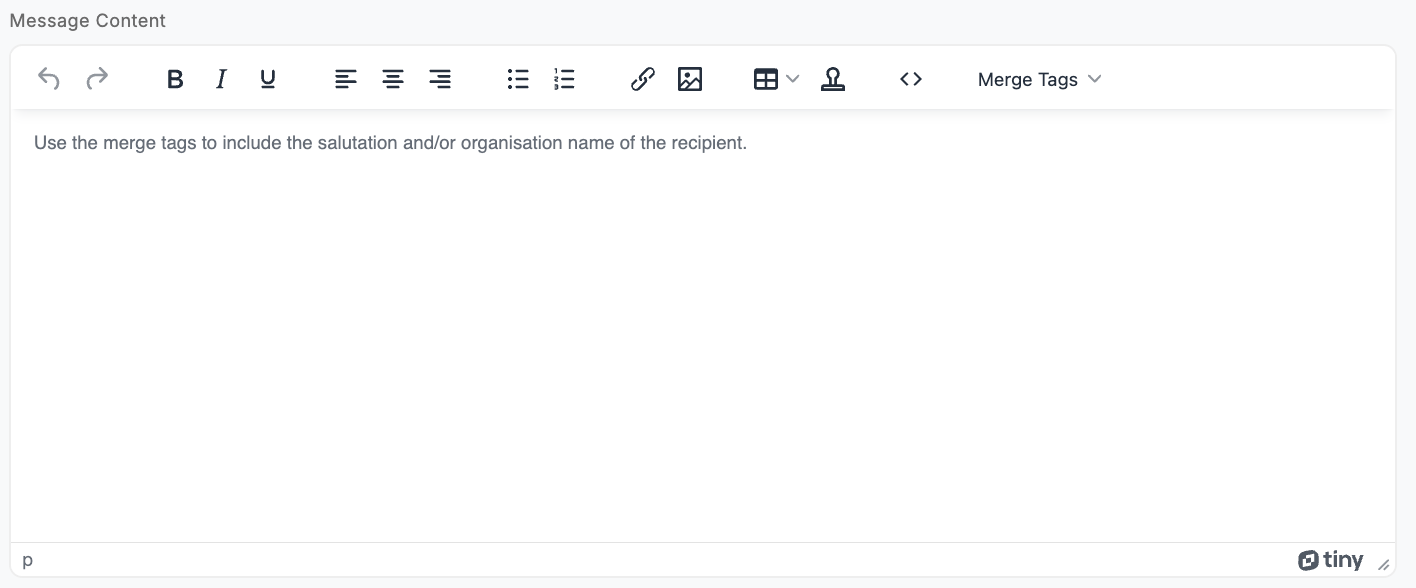
<> source code button and the Merge Tags dropdown on the right.PSN includes a built-in editor for creating and styling emails. If you prefer to paste in your own HTML via the <> source code view, avoid content generated by tools like Microsoft Word — these introduce hidden formatting that can break email rendering.
Instead, use clean HTML from a purpose-built email editor, or export directly from your existing platforms — for example:
- →Mailchimp / HubSpot — build within your platform and export the HTML
- →Stripo — structured email builder with reliable HTML output
- →Topol.io — simple builder for quick, clean templates
Use the Merge Tags dropdown (top-right of the editor) to insert placeholders that are replaced with each recipient's details at send time:
- →Salutation — e.g. "Dear John,"
- →Organisation name — e.g. "Manchester City Council"
Always Test Send to yourself first to confirm merge tags render correctly.
Campaign Reports — read the response
Click View on any sent campaign to open its engagement breakdown. Use these numbers to refine subject lines, audiences and send times for the next campaign.
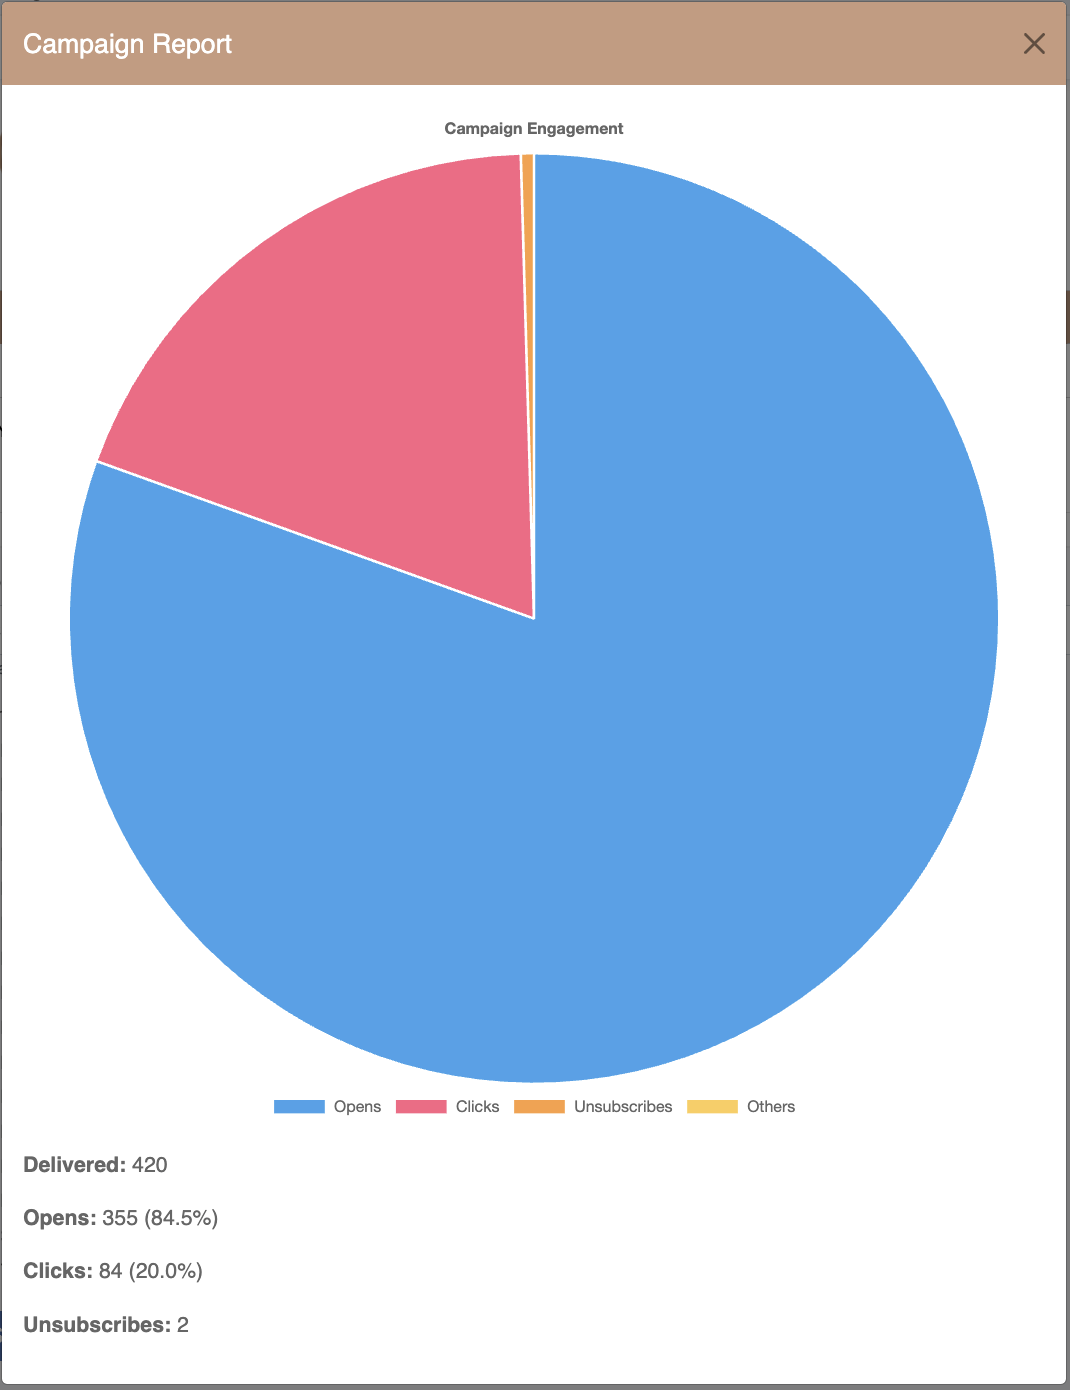 1234567
- 1Campaign Report headerModal title — close with the X to return to the Marketing page.
- 2Engagement pie chartVisual share of Opens, Clicks, Unsubscribes and Others — quick glance at health.
- 3LegendHover any segment in the chart to see exact counts.
- 4DeliveredTotal emails that reached an inbox (excludes bounces).
- 5OpensRecipients who opened the email — anything above ~25% is healthy in B2B public sector.
- 6ClicksRecipients who clicked a link — your true intent signal. Promote these into Sales pipelines.
- 7UnsubscribesWatch this trend over time. A spike means the audience or message wasn't right.
Test Emails & Opt-outs — the safety net
The Tools panel at the bottom of Marketing lets you control who can receive Test Sends and download the global unsubscribe list.
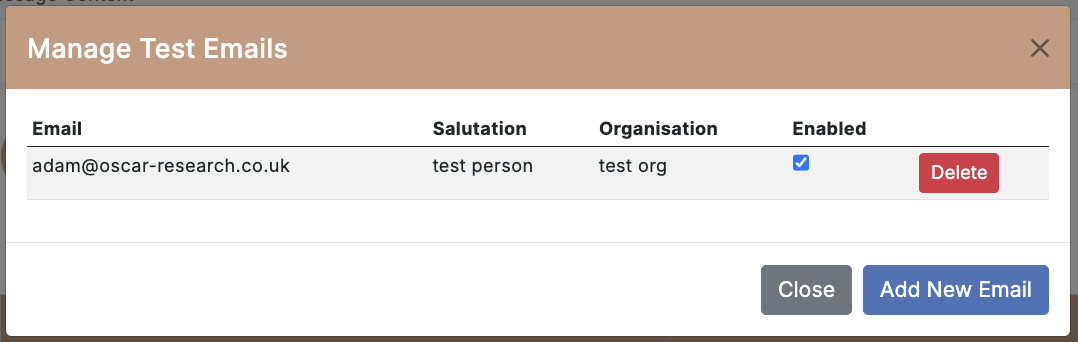
- 1Manage Test EmailsOpened from the Tools panel — controls which addresses can receive a Test Send.
- 2EmailThe test recipient's address. Add your own work address and a colleague's for QA.
- 3SalutationUsed by merge fields like {salutation} so test sends preview personalisation.
- 4OrganisationUsed by {organisation} merge fields — keep these realistic to catch formatting bugs.
- 5EnabledToggle to include or exclude an address from Test Sends without deleting it.
- 6DeletePermanently remove a test recipient.
- 7Add New EmailAdd another tester. Two or three reviewers is the sweet spot — more slows down approval.
Download Opt-Outs
The other Tools button exports every recipient who has unsubscribed. PSN automatically suppresses these contacts from any future campaigns you send through the platform — but keep a copy in your own systems to ensure opt-outs are reflected across all your communication activities.
Publish & Advertise — reach beyond your own list
Three channels for getting in front of PSN's wider public-sector audience without sending an email yourself.
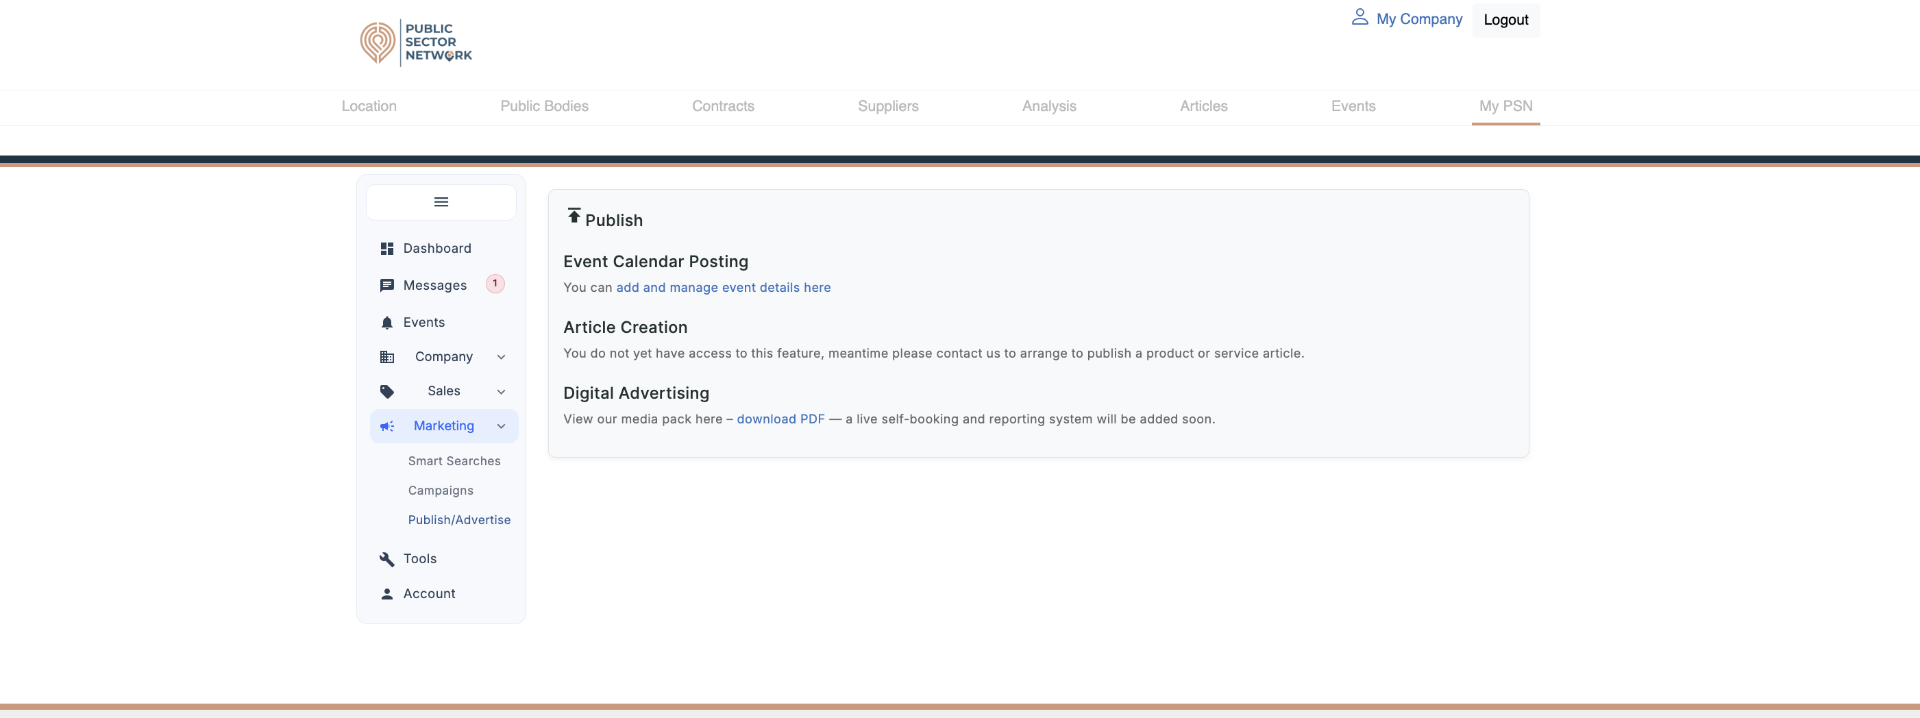
- 1Event Calendar PostingPublish your webinar or event to PSN's public calendar — a free extra channel for registrations.
- 2Add and manage event detailsSelf-serve link — create, edit and update your listings without a ticket.
- 3Article CreationSponsored editorial. PSN writes and places the piece — ideal for product launches and case studies.
- 4Contact us to arrangeArticle Creation isn't self-serve yet — reach out to your account manager to commission one.
- 5Digital AdvertisingBanner and sponsored slots across PSN's media properties — broader awareness reach.
- 6Download PDF (media pack)Formats, dimensions, audience demographics and rates. Self-booking is coming soon.
Event Calendar Posting
Submit your own webinars, demos and in-person events to PSN's public events calendar — extra reach beyond your own list.
Article Creation
PSN's editorial team writes and places a product or service article in front of the public-sector audience.
Digital Advertising
Banner and sponsored placements across PSN's media network — download the media pack to see formats and rates.
Marketing's job is to generate signal — Sales' job is to convert it. After every send, open Campaign Reports, identify the clickers, and create a Pipeline for each one as a Prospect. That's how a campaign becomes revenue, not just a number.